The Culinary Musings of a Good Eater

Casual glimpses Into the life of a good eater

Every last bite, gulp and delicious slurp for your viewing pleasure.

Thursday, February 16, 2012

Tasty burgers

It is hard to make a BAD burger.  You really have to work at it to screw up something so basic, so fundamentally and inherently great as a burger.  There are, however, lots of mediocre burgers out there.  Now don't get me wrong.  Even a mediocre burger is better than most things you could be eating.  I mean, seriously.....a salad?  No way any salad can compare to a burger.  Even a mediocre burger tops a salad.  If I go to McDonald's (like that's going to happen if I have a choice) I am getting a Quarter Pounder; not a McVeggie salad or cup of apples and nuts.  Give me a break.  Yeah, even a so-so burger is better than that junk.

What is so disappointing is that there are a lot of mediocre burgers out there.  It is disheartening to see a burger, already superior to most food, just by the virtue of it being a burger, that isn't great.  Eating a burger should make you happy.  It doesn't take that much effort to make a really tasty burger.  So why are there so many mediocre burgers?   Laziness?  Indifference?  Contempt for the glory that is the burger?  I don't know.  I do know that I rate most restaurants by their ability to make a good burger.  They might screw up the fries, the onion rings, the pan-seared squab served on a sunchoke puree, topped with bitter micro-greens and a persimmon puree, but if they mess up a burger they aren't going to get anymore of my business.  No sir.

So, when I find a good burger place I know I'm going to be a repeat customer.  A couple of large chains do it right:
In-N-Out: Tasty, drip-down-your-chin goodness
Five Guys: Pure, simple classic burger

More often than not, the best restaurant burgers come from small independent places.  Watch Diners, Drive-ins and Dives and you'll see some awesome burgers.  One of my favorites.....
Hodads: Beach burger Nirvana.  For my money, best on the Left Coast

I watch Diners, Drive-ins and Dives every chance I get.  I am guaranteed to see at least a couple of recipes that will be downright awesome.  I have seen some great looking burgers that have either validated what I've been doing or given me new ideas.  After watching a recent 'Triple D' marathon I found myself with a hankerin' for burgers.  Not one to deny a hankerin' I went out and bought some ground beef and pork.  Normally I would add some ground lamb to the mix, but I just couldn't find any at a decent price.  Still, beef and pork makes for a nice combo.  I actually toyed with the idea of adding ground bacon to the mix, but chickened out at the last minute.

Now I've been making cheese-stuffed burgers since I was a kid.  It started with finely diced bits of sharp cheddar mixed in with the meat.  Later I found that I preferred making a thick patty with a slice of cheese inside.  I usually want a sharp cheese inside; something like cheddar, bleu or gorganzola.  The sharp flavor nicely balances the rich fattiness of the meat.  While I love American cheese on top of burgers (just about as classic a flavor as you can get), I have never tried it inside of one.  After seeing a couple of places up in Milwaukee that make American-stuffed burgers, I decided to try it.


From The Hollow Leg Diner - images


There was about half a slice of cheese in each burger.  The cheese melts while cooking and lubricates the inside of the burger.  The burgers weighed in at about 1/2 lb.  I season the meat when it is mixed.  I like to get a lot of flavor into the burger, and I don't think just seasoning the outside does enough.  Seasoning varies every time I make burgers, but will usually include salt, black pepper, garlic powder, Cayenne pepper and paprika.


From The Hollow Leg Diner - images


I prefer my burgers cooked on the grill.  I really like the smokiness from cooking over charcoal.  If I want a pan seared burger, I'll cook it in a really hot cast iron pan and then finish in the oven.  My burgers are thick so just pan-searing is not an option.


From The Hollow Leg Diner - images


There's just nothing like the taste of smoky, melted cheese on top of a burger.  In this case the burgers were topped with a mix of sharp cheddar and Swiss or American and Swiss.


From The Hollow Leg Diner - images


Ahh, yeah!  Red onion rings under the melted cheese.


From The Hollow Leg Diner - images


Now that's a burger.  Toasted buns with mayo, mustard, ketchup, dill pickles, tomatoes and lettuce.


From The Hollow Leg Diner - images


Whaaaaaat!!!!????  What is wrong with this picture?  Leave it to Lupe to assemble the perfect burger upside down.  Geeeez!  Amateurs!


From The Hollow Leg Diner - images


Tasty burgers for the whole week.  After all; the burger is the cornerstone of any nutritious breakfast.


Lamb three ways

More Indian yumminess. This time it is all about the lamb.

Boti gosht, a simple lamb curry, is Lupe's favorite.  Flavored with fried spices and curry leaves, delicious chunks of lamb, slow cooked until tender.

Green bean curry.  Seared strips of lamb and green beans in a tasty curry sauce.

Lamb daal.  Green lentils and lamb chunks in a spicy tomato sauce


From The Hollow Leg Diner - images

Prep, prep prep......

I am really growing very fond of Indian cuisine.  It has some bold, hearty flavors that really appeal to me.  The only thing that I don't like is the prep.  As with stir fry, Indian cooking requires lots of prep.  Mise en place is crucial.  You need to have your crap in one sock (as we would say in the Navy.....well we didn't quite say it that way).

This is just some of the prep for 3 Indian dishes.


From The Hollow Leg Diner - images


Lamb meatballs ready to go into the pot.


From The Hollow Leg Diner - images


Lamb meatballs are simmering and the vegetable korma is just about done.  You can tell by the clock on the stove that we are eating a little late.  All that prep takes time.


From The Hollow Leg Diner - images


A hot, steaming plate of lamb kofta curry and vegetable korma


From The Hollow Leg Diner - images

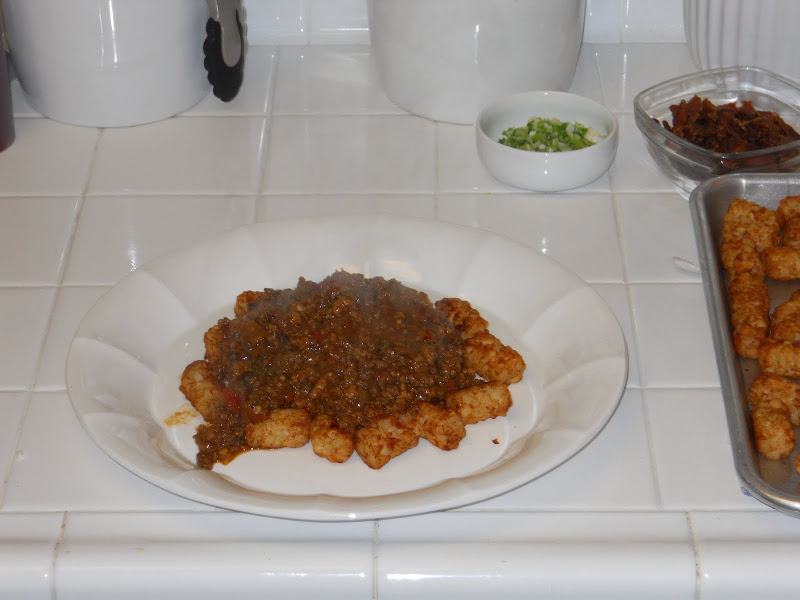
Chili-cheese tots

WARNING: As required by the Food and Drug Administration, Center for Disease Control, American Medical Association, U.S. Department of Agriculture, Occupational Safety and Health Administration, Department of Health and Human Services, Los Angeles County Health Department, Michelle Obama, Mayor Bloomberg and all other nanny-state food police agencies and individuals, I am required to inform you that this recipe is not healthy, nor does it meet federal guidelines for nutritional content.*

Well that's out of the way so now we can get on with the food.

Step 1
Make yourself some good chili.  I know, I know; you don't have time to make chili, it's cheaper to just buy a can of chili from the store, or you suck in the kitchen and couldn't make a PB&J.  Whatever.  It ain't hard.  Make it yourself.  No pressure.  You can do it.

Step 2
Make some tater tots.  OK, you don't have to make the tater tots.  Just open the package and heat them up.  Got a deep fat fryer?  Use it.  If you don't want to fry the tots, you can just bake them in a hot oven.  Just put some oil on the sheet pan to keep them from sticking.  Get them nice and crispy.


From The Hollow Leg Diner - images


Step 3
Slop some of that nice, hot, tasty, homemade chili on top of the tater tots.


From The Hollow Leg Diner - images


Step 4
Cheese, and lots of it.  Good, sharp cheddar cheese is best.  If you happen to have a salamander, use it now.  If not, put the plate under the broiler for a few seconds to get it all gooey and nom-nom-nommy.


From The Hollow Leg Diner - images


Step 5
Toppings!  Whatchya want on chili-cheese fries?   I don't know about you, but I want onion and bacon bits.  White or red onion would be best.  I only had green onions, so that's what I went with.


From The Hollow Leg Diner - images


Step 6
Get your grub on.  You know you want it.


From The Hollow Leg Diner - images


From The Hollow Leg Diner - images


I apologize for the salad that appeared in that photo.  That was a terrible oversight on my part.  I assure you that no healthy food was consumed with the chili-cheese tots.  That just wouldn't be right.


* In the inimitable words of Eazy E: "F**k da food police"

Tuesday, February 14, 2012

Fermented Chili Sauces


Fermented Chili

1gal.                 Ripe chili peppers (Fresno, Serrano, Cayenne, Tabasco, Thai bird) mashed
½ cup               Kosher salt (not iodized table salt)
1 cup                White wine vinegar (Pinot Grigio)

This recipe makes the basic fermented chili mash that is used as a base for the following chili sauces.

Pepper to salt ratio is 32:1 (1.5 Tsp salt for every cup of mash)
Wash peppers
Remove stems but leave the ‘crown’
Cut peppers into chunks and then purée in a food processor
Add salt and mix thoroughly in a crock (Water can be added to keep all mash submerged, but this will result in a thinner sauce.) 
Leave crock uncovered for a day to gather bacteria
Cover crock with cheese cloth or towel
Ferment for 12 weeks (Fermentation time can be anywhere from 1 week up to 6 months.  Longer fermentation will make sauce more pungent)
Skim off mold at the end of the fermentation period
Add enough vinegar to mash to lower pH to less than 4.6.  I use white wine vinegar for the base acidity level.
Mix mash
Cover crock with cheese cloth or towel
Let mash blend with vinegar for another two weeks
Skim mold
Run mash through a food mill or blend and then run through food mill-depending on final use.
Save seeds and skins from food mill to make chili powder


Hot Chili Sauces - Basics

In all chili sauce recipes, the consistency of the final product is regulated by adjusting the amount of vinegar added and method of processing.  I use cane or palm vinegar for setting the acidity level and then fine tune with rice wine vinegar.  Rice vinegar is not as acidic or harsh as the other types.  The mash can be left as is for Sambals or the Chili-Garlic sauce.  The whole seeds and minced garlic and ginger pieces produce the traditional chunky texture desired.  The mash can also be puréed in a blender for smother sauces.  The purée is left as is, or run through a food mill for thinner sauces.  Thin, Tabasco-style hot sauces are pressed through a sieve.  Jaggery, an unrefined cane or palm sugar, is preferred for its mellow flavor. 


Sambal Oelek

2 cups              Fermented chili mash
½ cup               Cane or palm vinegar
2 heads            Garlic-crushed or minced
2”                     Ginger-fresh minced
4 Tbls               Fish sauce
3oz.                  Jaggery-shaved
2oz.                  Lemon grass- white part only-minced and ground in a mortar and pestle
1 Tbls               Lime zest
To taste            Salt

For a really chunky Sambal use the chili mash as is.  For a smother sauce, purée some or all the mash before mixing with other ingredients.  Mix all ingredients, except lime zest and salt.  Place mixture in a sauce pan and bring to a boil.  Reduce heat and simmer for 5-10 minutes.  Remove from heat and add lime zest.  Saltiness is mostly controlled with fish sauce.  If the sauce is too ‘fishy’ for your taste, but still needs salt, you can add kosher salt to taste.


Pineapple-Garlic Chili Hot Sauce

3 cups              Fermented chili mash
¾ cup               Pineapple- puréed with juice
½ cup               Cane or palm vinegar
½ cup               Rice wine vinegar
1 Tbls               Marjoram-ground
1 Tsp               Mexican oregano-ground
1 Tsp               Cumin-ground
¼ Tsp              Clove-ground
¼ Tsp              Cinnamon-ground
1 Tsp               Black pepper-ground
1-2 heads         Garlic-pureed
¼ - ½               Brown or White onion- puréed
To taste            Salt

Use a spice grinder to grind all spices into a very fine powder.  Purée garlic, onion and pineapple in a blender.  Add chili mash and purée.  Add vinegar to adjust for taste and consistency.  Salt to taste.


Chili-Garlic Sauce

3 cups              Fermented chili mash
½ cup               Cane or palm vinegar
¼ cup               Rice wine vinegar
1-2 heads         Garlic-minced
To taste            Salt

Mix chili mash and garlic.  Add cane/palm vinegar for desired acidity and consistency.  Use rice wine, if needed, to adjust consistency.  Salt to taste.


Sriracha  (Tuong Ot Sriracha)

3 cups              Fermented chili mash
½ - ¾ cup        Cane or palm vinegar
3-4oz.              Jaggery-shaved
1-2 heads         Garlic-puréed
To taste            Salt

Purée garlic and chili mash in a blender.  Purée the garlic with a little vinegar first to ensure it is processed into a smooth paste before adding the chili mash.  Add vinegar to set acidity and consistency.  Mix in jaggery to taste.  Salt to taste.  Sauce can be used raw or cooked.  For cooked: Place in a sauce pan and bring to a boil.  Reduce heat and simmer to reduce. 

Chili Powder

2 cups              Chili mash remnants (seeds and skins) after processing through food mill

If using a dehydrator, spread mash over screen and dehydrate until all moisture is removed.
If using the oven, spread mash in a thin layer over a ¼ sheet pan. Dehydrate in low oven (150° - 180°), stirring occasionally to dry evenly
When the chili is completely dried use a fork or mortar and pestle to break up chunks
Place dried chili on a sheet pan and smoke in a BBQ or smoker for 1-2 hours.  Time in smoker depends on level of smokiness desired.  Use hickory or mesquite, depending on taste.
Grind chili in a spice grinder and store in an air tight container.

Friday, January 13, 2012

The holiday ritual

Every year as the Christmas season rolls around we start thinking about making tamales. Like carols, presents and the tree in the living room, the tamale has become an absolute Christmas essential. It just wouldn't be Christmas with a massive tamale-making session. So sit back as I walk us through the tamale ritual.

Day 1
Protein prep

Oven roasted pork shoulder is my meat of choice for tamales. The meat is heavily spiced and salted and roasted in the oven for several hours at 300 -325 degrees. One or two chopped onions, a few jalapenos, some tomatillo and garlic cloves go into the pan. Some of the veg goes under the meat to insulate it and some goes on top so the foil won't stick to the meat. I usually put a cup or two of chicken stock in the bottom of the roasting pan and loosely cover the pan with tin foil. This keeps the meat moist and prevents burning before the fat starts to render out. I'll turn the meat a couple of times during cooking. The last hour or so the meat is uncovered to allow the exterior to crisp up a little.
From The Hollow Leg Diner - images
Pulling the pork 
When the meat is tender it is taken out of the oven and allowed to rest and cool a little. When cool enough to handle I will start shredding up the meat. As it is shredded, I'll squeeze some lemon juice over it. I also separate most of the fat from the pan juices and strain out the veggies. If the veggies are crispy they'll get tossed. If the are still soft, they get mixed into the meat along with the pan juices. This keeps the meat moist and adds an incredible flavor. By the way; this is also how we make our carnitas. I'm not big on doing traditional carnitas anymore. I think I get more flavor and the meat is more tender when oven roasting.
In addition to the pork that I roasted I also had Lupe pick up a couple of roasted chickens from Costco. This is a cheap and easy way of making chicken tamales. The Costco chicken is super tender and well brined. all you need to do is mix it with a good chile sauce and you are ready to stuff some tamales.
From The Hollow Leg Diner - images
Chili sauce
I start the sauce with a variety of chiles. This time I used a lot of Japones chile. In the past I used equal parts of California, New Mexico and guajillo along with some ancho, morita and d'arbol. The first three are sort of the base flavor. The ancho gives a sort of mellow heat, the morita adds smokiness and the d'arbol really gives it a kick. My wife and her family use d'arbol in everything and, up until recently, so did I. I've always thought that d'arbol had a somewhat harsh flavor. Lately I have used Japones instead of the d'arbol. If anything, the Japones are hotter, but it is a much smoother flavor. In this batch of chile sauce it was the japones as the dominant flavor. An added benefit is that the sauce was a much more vibrant red color than what I am used to. I start by simmering the chiles in chicken stock. After an hour or two the chiles are strained out of the stock and pureed in the blender with salt, onion, garlic and spices (oregano, marjoram, black pepper, clove and cinnamon). A variation on this would be to add the onion, garlic and spices to the stock. I would do this if I had to cook the chicken in the stock. Simmering the chicken in the chile-infused stock adds a lot of flavor. Since I had roasted chicken this time I omitted that step.
From The Hollow Leg Diner - images
Running the chili sauce through the food mill
The chile puree is passed through the food mill to remove all the seeds. After that I heated lard in a heavy pot and then added the garlic-onion puree. When the puree started getting a little color the chile puree was added to the pot. Some of the chile-infused stock was added to the sauce to adjust for consistency. The sauce is simmered for at least 5 to 6 hours or until it starts to mellow. The long, slow simmer takes the harsh edge off the chiles and onion.
From The Hollow Leg Diner - images
Chili verde
Since I am incapable of making just one type of tamale, I found myself making a chili verde sauce as well. I roasted a ton of jalapenos and tomatillos and then pureed them separately. I also pureed a couple of onions and a bunch of garlic with salt, pepper and spices (Cayenne pepper, oregano and marjoram). The onion-garlic mixture is cooked in some lard until it starts to brown. Then the pureed jalapenos are mixed in along with a bunch of cilantro. I then add the tomatillo puree until I get the right level of acidity. This sauce is also simmered for several hours.
From The Hollow Leg Diner - images
Day 2
Assembly
Step 1 - Have your wife enlist the aid of all her sisters and nieces.  It is important to have several family members willing to perform several hours of labor for free (we might pay them in tamales if they're really industrious ;-)

From The Hollow Leg Diner - images
The crew

After soaking the corn husks in hot water for a while, it's time for assembly.  The best method is to set up some sort of assembly order and assign tasks to each person (Tamale-Bot? A-tamal-aton?).
From The Hollow Leg Diner - images
After much trial and error, we have found that larger tamales are better.  For me, the tamale is as much about the filling as it is the masa.  The tamale has to be large enough to get a good-sized scoop of filling.  We used to make smaller tamales with a single hoja as a wrapper.  With the larger tamales that we are making, it is best to use two hojas head-to-head and overlapping slightly.  Using this method you can't just stack the tamales upright in the steamer.  It is necessary to use string to tie up the tamales.


Into the steamer
From The Hollow Leg Diner - images
finished product
From The Hollow Leg Diner - images
Tamale dinner
From The Hollow Leg Diner - images

Wednesday, November 16, 2011

I'm so bored with pizza. Time for something new

I feel an Indian cuisine obsession coming on. I went on a shopping spree over in the Little India section of Artesia today.
From The Hollow Leg Diner - images
Wooooo doggy. There are some very interesting and diferent smells wafting through the house today. I can't wait to try out some of the new recipes I've found.

Chili or Chilé? Salsa by any other name

I've been experimenting with different types of salsas and hot sauces lately. The big salsa project started when I had to make a salsa for tortas ahogadas. I found a recipe on YouTube that seems to be common to Jalisco or possibly just Guadalajara. The recipe uses just rehydrated chile d'arbol, a little pineapple vinegar, garlic and spices (salt, pepper, cinammon, clove & marjoram). Being very pleased with the results, I decided to try a few variations. I used dried chile japones instead of the d'arbol. I've always thought that the chile d'arbol is a little harsh. The chile japones seems to have a smoother taste. I also added some Mexican oregano and a touch of ground cumin. I have made several batches using different types of vinegar. So far, the best has been with a pinot grigio vinegar. Lupe has given these salsas the official "good enough for Mexican palate" seal of approval. She especially likes my Fake-a-tio salsa. According to her well-tested and discerning palate, the Fake-a-tio is very similar to her go-to salsa: Tapatio. I have been doing a little experimenting with fermented chile hot sauces as well. I had a big end-of-season harvest on my Cayenne chile plants, so I decided to make some special hot sauces. I have three different batches fermenting at the moment. The Cayennes were mashed and mixed with a garlic puree. I also made a couple of batches with red jalapenos. One is just straight jalapeno and salt and the other has pureed garlic and onion. I'm not sure if the garlic and onion purees should be fermented with the chili, but I'll find out in three months. Come February I'll scrape the mold and add some good vinegar. After another couple of weeks it should be ready for bottling. It has only been a week and the mashes are really starting to smell great. I have a feeling that they will become a little more pungent over time. Hopefully, the end result will be something like Sriracha (the garlic chili mix) or Tobasco (the straight chili).
From The Hollow Leg Diner - images

More pizza porn

Now that I got a pizza stone and some decent pizza pans I've been making a lot of pizza. I've had a couple of dismal failures, but some real successes. I don't have pizza tossing skills yet. Oh well; I'm managing to make it work.
From The Hollow Leg Diner - images
Not pretty, but tasty.
From The Hollow Leg Diner - images
Would you buy a pizza from this shmo?
From The Hollow Leg Diner - images
End result - tasty pizza goodness.
From The Hollow Leg Diner - images

Sunday, October 23, 2011

Bacon-cheddar pizza......damn skippy

Wow! Been a long time since I posted anything. Been fighting the good fight in my battle with anorexia. I won. Yeah! To celebrate my victory over anorexia I thought it might be a good idea to make some pizza. I couldn't decide what type to make, so I made three different types. That'll show that damn anorexia who's the boss around here.
From The Hollow Leg Diner - images
I had made some tomato sauce two days prior for another meal. I took some of the kickass sauce and added some basil-garlic olive oil to make a pizza sauce. With the sauce already made, knockin' out the pizzas was relatively quick. I started the pizza dough when Lupe's parents and sister came by the house. By the time the chit-chatting out on the patio was done, the dough was ready. Lorena has some pizza making experience, so she took care of forming the pizzas. In the meantime, I had rendered some thick bacon end pieces and had sauteed some spicy chicken breast chunks. The big pizza (16") was topped with the chicken, spicy meatballs, red onion slices, black olives and cheese. That one went in the oven first as we worked on the two little ones. One was a very simple Pizza Margherita-like affair. It was topped with the pizza sauce, ripe garden tomato slices and mozzarella cheese. Just as it was coming out of the oven I tossed some fresh basil on top. Nice. If I could just learn to make my own mozzarella I could have totally homemade Pizza Margherita. The star of the evening had to be the cheddar-bacon pizza. I wanted to make a pizza that would taste like a bacon-cheddar burger. Topped with sharp cheddar, thick-cut bacon pieces, red onion, jalapeno and blue cheese crumbles, this pizza really hit the mark. The only thing that could have made it any better would have been adding some ground beef to the topping. Absolutely the best pizza I've ever made. Next time I do this one I'm goin' full Monty on it. I'll make it in my new 14" Sicilian pizza pan and add the ground beef. I might even try putting some pickles on it.
From The Hollow Leg Diner - images
Bacon-cheddar pizza. Best thing ever......damn skippy.